How to Quilt a Thread Painted Surface
WonderFil Specialty Threads
We're sharing this post by Christine Baker from QUILTsocial, a fantastic site where you can find blogs featuring tips and projects about all things quilting!
A short while ago we posted about thread painting with Konfetti™ and Tutti™ which you can check out here.
Check out my finished thread painting!
I had so much fun playing with my Konfetti™ and Tutti™ threads, embellishing my book cover with thread painting. It’s equally important now to know how to quilt this thread painted surface!
I love how the threads make the fabric designs stand out more – check out the before and after photo of the large flower:

Thread painting with Konfetti™ and Tutti™ – before and after
Time to rip out the interfacing
The next thing to do before we get quilting, is to rip out the excess interfacing from the back of the fabric. Depending on the type of interfacing you use, you may not need to do this, but mine is “tear-away” interfacing, so it is quite easy to remove. Just follow the manufacturer’s instructions for the type of interfacing that you are using.

Pulling the interfacing away from the back of the fabric
Layering our quilt sandwich
First of all, let’s press the embellished fabric as it has shrunk in some spots due to the thread painting. Now we need to cut a piece of batting and backing fabric the same size. When I am quilting small pieces like this I love to use 505 Spray.
To use it, first spray your backing fabric with a light coating of the adhesive spray then place your batting on top. Next, spray your batting with the adhesive then place your top fabric on top. Smooth it out with your hands, flip it over and smooth the back and then flip AGAIN and smooth the front one more time. Next we are going to quilt!
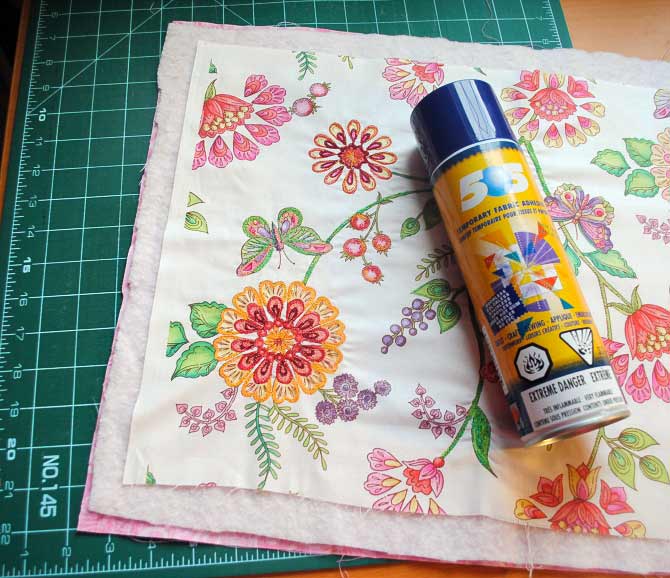
Fuse the layers of the quilt sandwich together with 505 Spray
Quilt as desired
Are you one of those people who just hate it when your instructions say “quilt as desired”? As a pattern designer, I’m guilty of using that phrase, but have no fear!!
For this project I’m just going to meander all over the fabric, avoiding the pieces that I embellished with the thread painting. I’m going to use the pale pink Konfetti™ thread to do my quilting as it will blend in nicely with the white background.
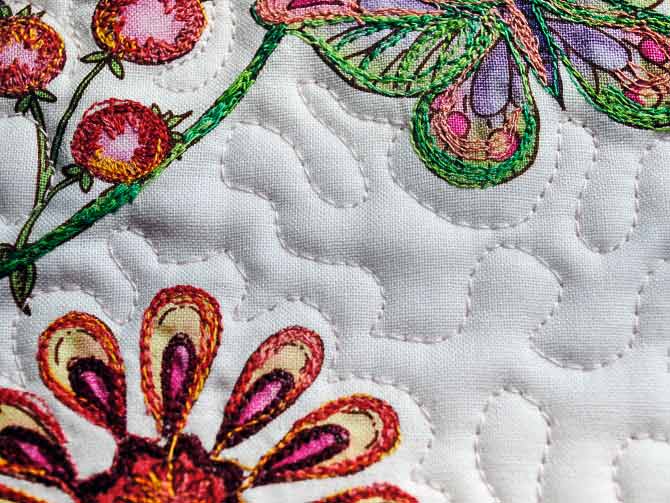
Meander quilting around the thread painting
Below are some tips from another post by Christine Baker on QuiltSocial. For the full post click here.
Some tips for success with free motion quilting
When I teach my machine quilting class, I ALWAYS give my students these tips BEFORE we start:
- Relax and breathe! And don’t be too hard on yourself. Becoming proficient at machine quilting takes practice – LOTS OF PRACTICE.
- Free motion quilting is like doodling with your threaded sewing machine needle – so practice with pen and paper first until you get the feel for the new design.
- When you first start stitching a new design, first focus on the shape, and then as you get the hang of the shape start to try to get your stitches more uniform in length. If your stitches are really small then you need to move your hands faster. If your stitches are really big, you need to move your hands slower OR speed up your machine.
- If you get frustrated, STOP and TAKE A BREAK.
- There are no right or wrong ways to execute a particular free motion motif. No one but you knows what design you planned to stitch on your quilt, and therefore no one will know if it looks different than you intended. As you practice you’ll find that you develop your own style of quilting – one that is comfortable for YOU.
Start with the basics – meander (stippling) and loops
The first stitch to learn when machine quilting is stippling or meandering. And then progress to loops. These are the basic building blocks for most other designs. And even if you don’t become comfortable with more complex designs, you CAN meander or stipple quilt any quilt! Here are samples of my meandering and loops and you can also view this YouTube video which goes over the basics of free motion machine quilting.

Meander machine quilting pattern with Fruitti™

Loops machine quilting pattern with Fruitti
Swirls, swirls everywhere
Once you perfected your loops you can progress onto swirls and waves. These can be used on their own in borders and backgrounds or integrated into other designs with other motifs such as hearts or leaves. Here’s a picture of a few different swirl and wave designs that I often use:
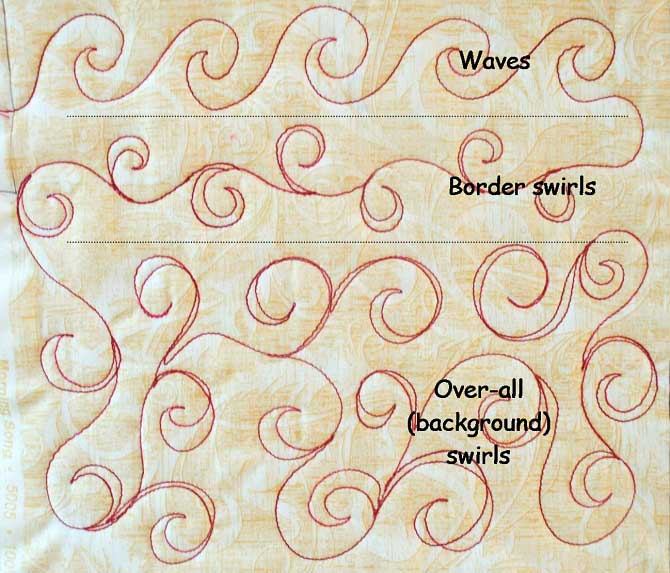
Swirls and waves free motion quilting design