Contact Us

Use the form on the right to contact us.

You can edit the text in this area, and change where the contact form on the right submits to, by entering edit mode using the modes on the bottom right. 

2915 19 St NE
Calgary, AB, T2E 7A2

18662506101

WonderFil Specialty Thread Blog

WonderFil brings you the latest news, events, upcoming thread lines and special tips and advice. Follow WonderFil Specialty Threads on our social media: Facebook, Instagram, Twitter, Pinterest, and Youtube.

Filtering by Tag: diy

Visible Mending on Denim with a Sashiko Stitch

Maura Kang

Have your jeans sprouted a new hole? While distressed denim might be in, you can still salvage a beautiful aesthetic using visible mending. This is a gorgeous way to repair a hole in a piece of clothing and refresh your wardrobe, turning ugly holes into something beautiful and intentional.

Screen Shot 2020-04-09 at 11.15.22 AM.png

Materials:

-       A scrap piece of denim or other heavy fabric large enough to completely cover the hole you are patching, with at least 3 inches to spare on each side.
-       A thick hand embellishing thread. We will be using #8 Eleganza perle cotton thread as it stands out beautifully and is ideal for any hand embellishment.
-       A hand sewing needle that will fit your thread. We recommend using a sashiko needle as it has an eye large enough for the heavier thread, and also is much longer, making it easy to make a lot of stitches at once.  You can also use a long embroidery needle, such as a long darner, as another alternative.
-       We also recommend using a thimble while doing this technique. Because of the number of stitches we have to make it will allow you to stitch more effectively and keep your finger from bruising.


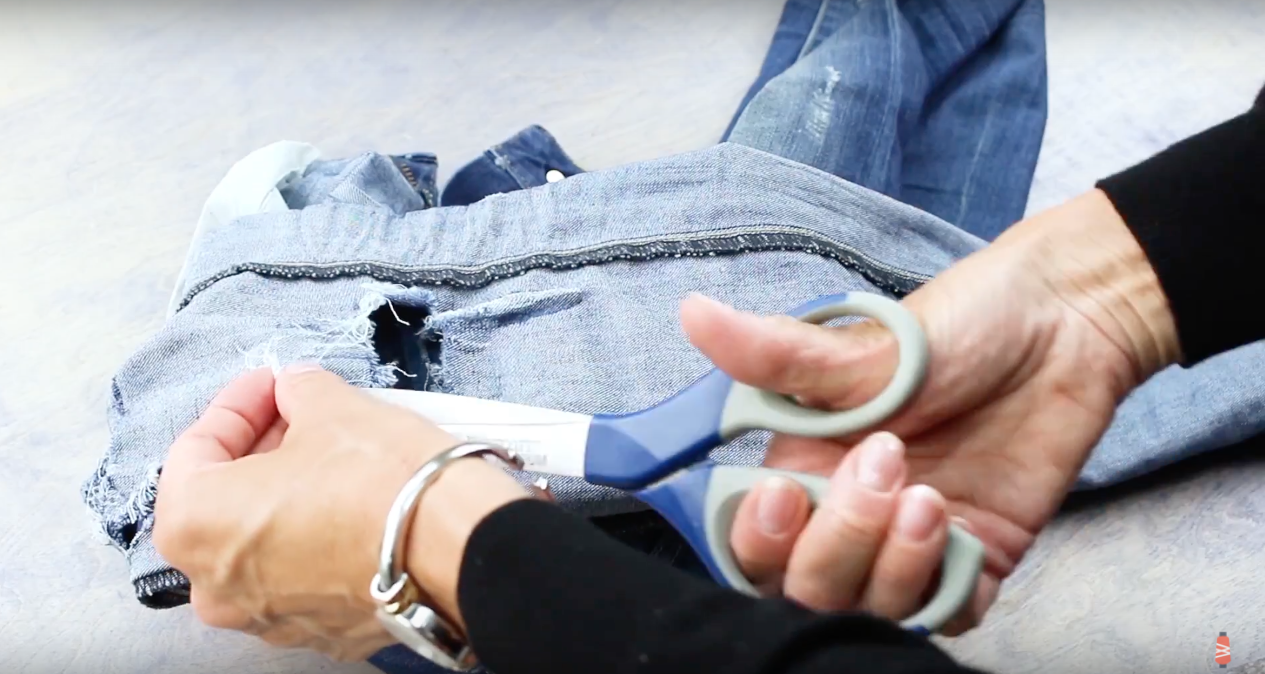
To begin, turn the jeans inside out and find the hole you want to repair. Then you’ll want to trim the excess thread around the hole to clean it up.

Screen Shot 2020-04-09 at 11.30.30 AM.png

Once the edges of the hole are trimmed and straight, place your denim scrap over the hole. Ensure that you have at least 3 inches of extra fabric around each side of the hole and pin it in place.

Screen Shot 2020-04-09 at 11.33.09 AM.png
Screen Shot 2020-04-09 at 11.33.23 AM.png

Now turn your jeans back right side out. Be careful not to get caught up on any pins. You’ll actually be able to see from the right side where you’ve placed the pins around the edge of the scrap denim, so you can use this as a guide to know where not to stitch outside of the area.

Screen Shot 2020-04-09 at 11.36.34 AM.png

Thread your needle and tie a knot at the end of your thread. You can hide your knot by starting between the two layers of fabric.

Screen Shot 2020-04-09 at 11.39.03 AM.png

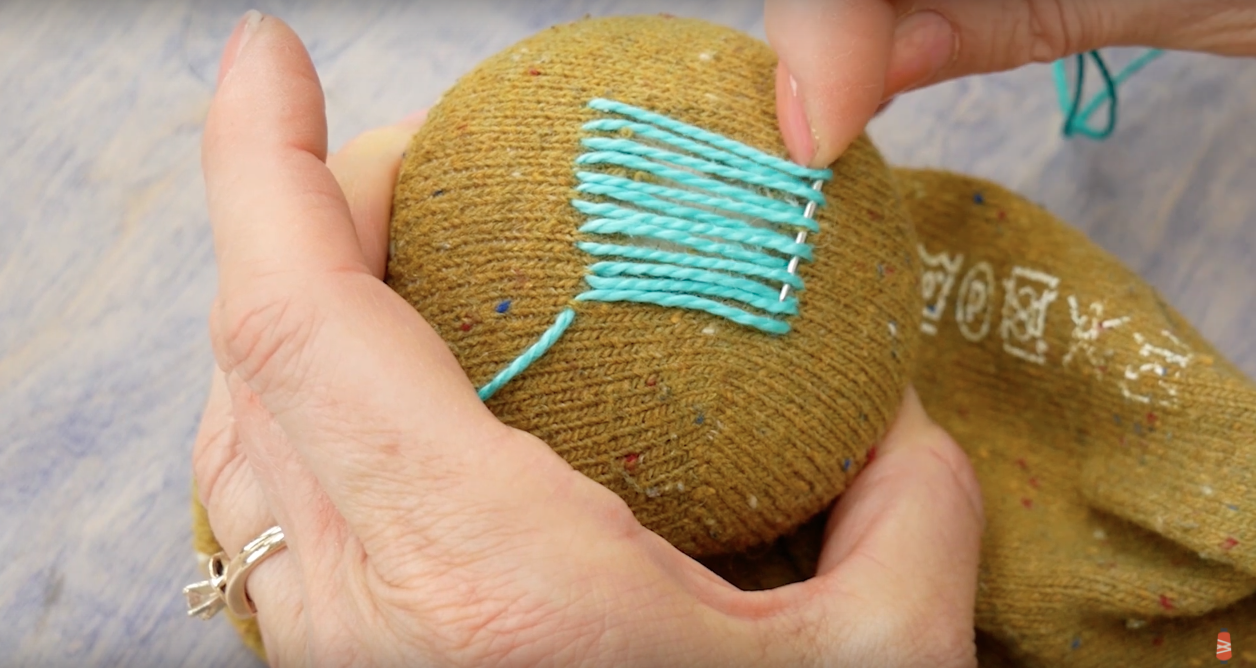
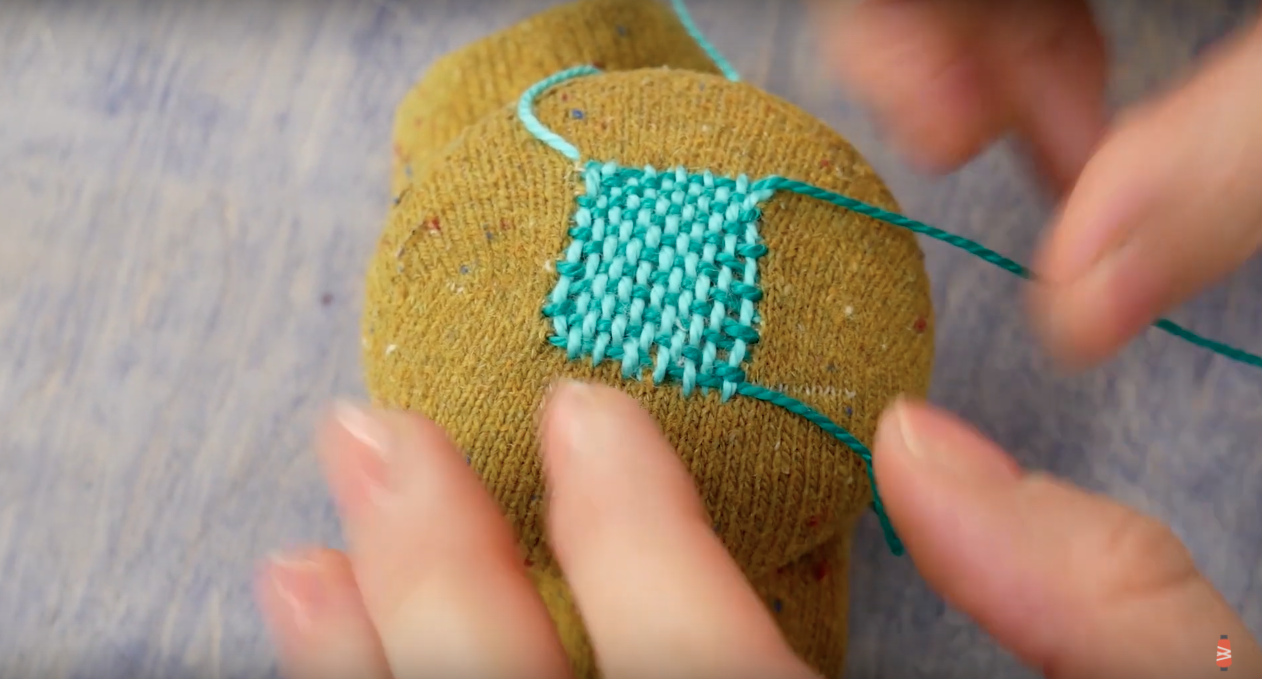
Depending on what design you may want or your sewing experience, you can just do straight lines, curved, or something else funky if desired. We are going to keep it simple and just do a simple straight running stitch.

Screen Shot 2020-04-09 at 11.56.57 AM.png
Screen Shot 2020-04-09 at 12.01.30 PM.png

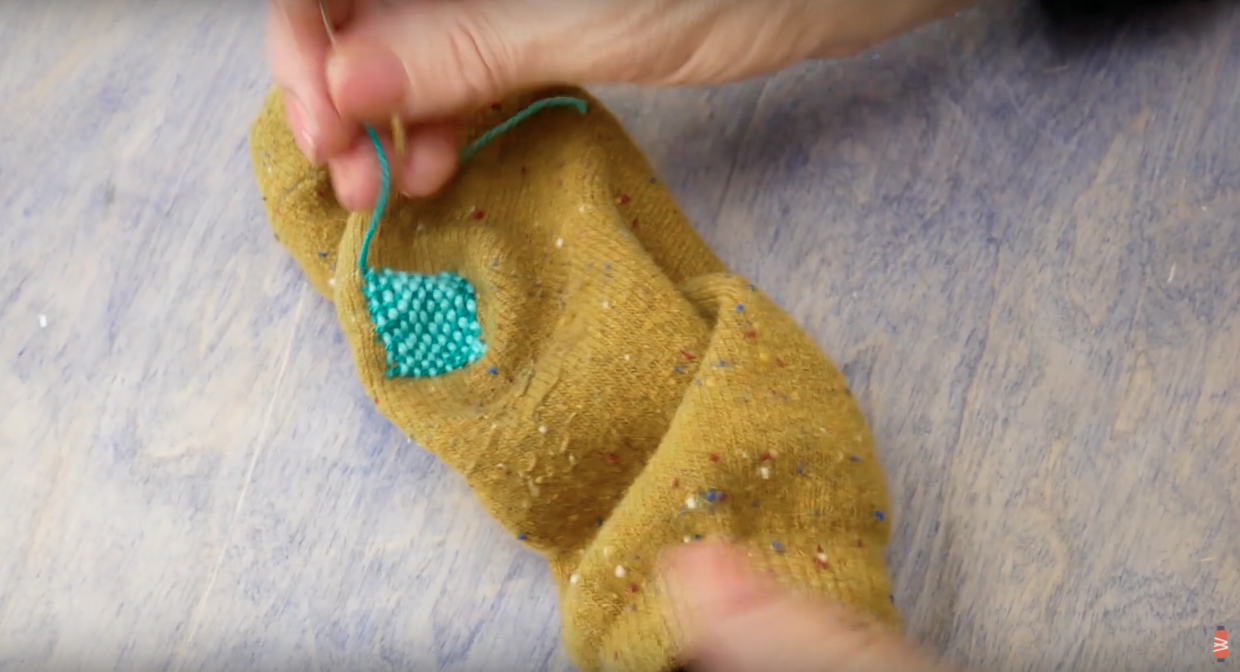
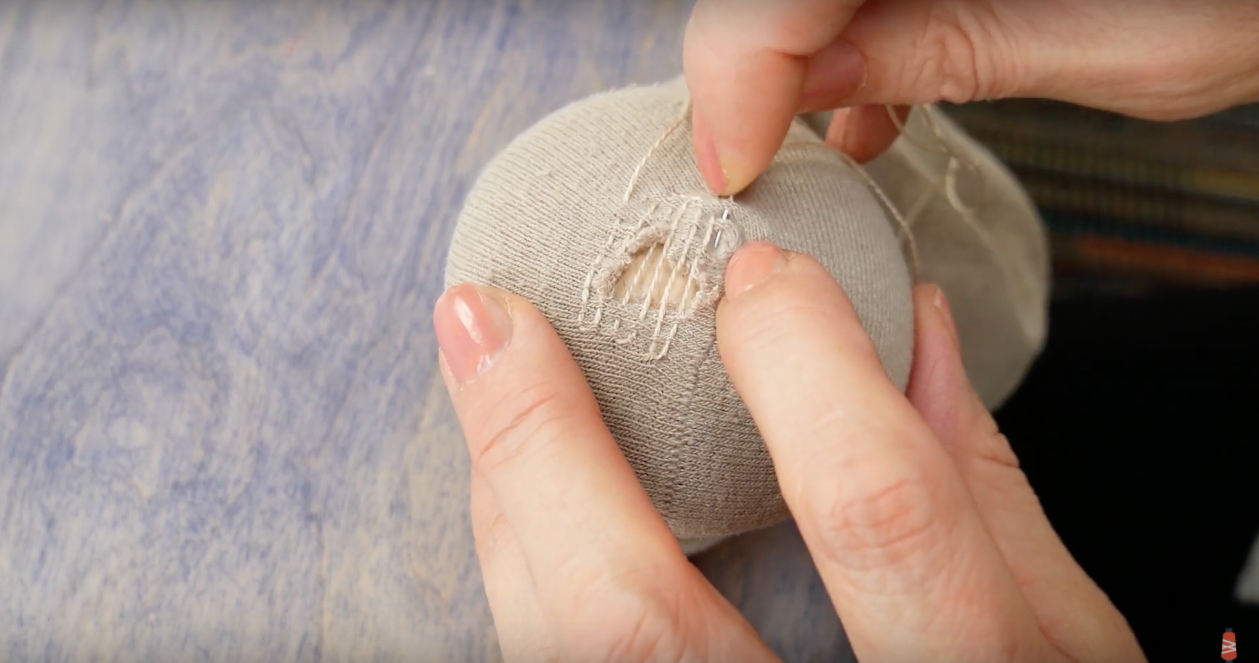
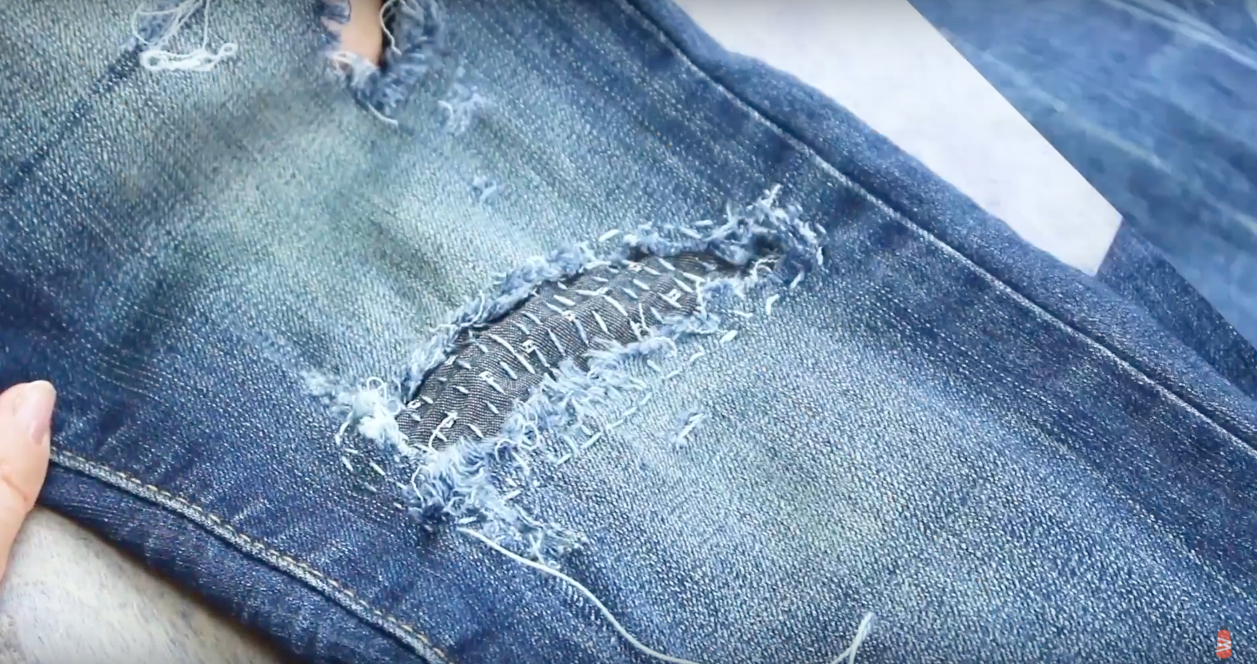
Try to keep your stitches even, but if it is not perfect that is okay because you will still achieve a hand done look. Continue doing these running stitches along the entire length of the hole, row by row. Ensure that you are stitching well past the edges of the scrap and onto the jeans themselves to ensure the scrap will be secured. When you are done it will look something like this:

Screen Shot 2020-04-09 at 12.01.06 PM.png

When you are finished do not forget to tie off the thread on the wrong side of the fabric.

Screen Shot 2020-04-09 at 12.05.03 PM.png

With this incredibly simple technique you can save your favorite pair of jeans. You can experiment with different materials and scrap fabrics for a totally unique look you can make your own!

Screen Shot 2020-04-09 at 12.06.04 PM.png

We hope that you enjoyed making this project! Everything is open to interpretation and we would love to see how yours turned out. Tag us on Facebook @wonderfil, Instagram @wonderfilspecialtythreads, or using the hashtag #wonderfil. Happy crafting!

Simple Ear Guard for Face Masks

Maura Kang

If you’re wearing a face mask using elastic hoops, this simple ear guard will alleviate the pressure they put on your ears by allowing you to hoop them behind your head instead. Two buttons and a few pieces of scrap fabric and batting is all you need to make one! The best part is, they’re incredibly fast to stitch together and can save you a lot of pain, especially if you’re wearing your mask for several hours. Don’t forget to check out our accompanying face mask tutorial to make your own: https://www.wonderfil.ca/blog/easy-diy-face-mask-with-filter-pocket-amp-fitted-nose-crimp/4/8/2020

Materials:

Download the super simple pattern by clicking here.

We used Designer 40wt all-purpose polyester thread to sew our ear guards for added security

We recommend DecoBob 80wt cottonized polyester in pre-wound bobbins as this strong thread offers the most consistent tension for ease of sewing.

2 pieces of fabric cut to the size indicated in the pattern

1 piece of batting cut to the size indicated in the pattern

2 medium sized buttons

Direction:

Before starting, don’t forget to download the pattern linked at the top of our materials list and choose the size you wish to sew. We’re demonstrating using the child size in the pattern. Cut out your 2 pieces of fabric and the batting. These pieces are small enough that we were able to cut them from our scraps!

1.png
2.png

Place your batting piece together with one of the fabric pieces against the wrong side. Pin together and sew all the way around on a ¼” (0.63cm) seam allowance.

3.png
4.png

We added two rows of quilting through the middle to further secure the pieces together. This batting adds an extra layer of cushion against your head so that it sits more comfortably.

5.png

Lay this stitched piece together with the second piece of unstitched fabric facing right sides together. Pin in place and sew on a ¼” (0.63cm) seam allowance, leaving a 2” (5.1cm) gap to turn the piece through. Don’t forget to backstitch at the beginning and end.

6.png

Trim the extra fabric away from the edges, being very careful not to cut into your stitches. Then turn the piece right sides out.

7.png
8.png

We handstitched the remaining gap closed using DecoBob 80wt thread, the same thread we used in the bobbin while sewing in the machine. This small thread will hide better in the fabric so it won’t be seen. We used a smaller short darner size 11 needle to sew it.

9.png
10.png

For the final step, we’ll be sewing the two buttons on by hand. Using Designer 40wt thread now and a sharps needle, simply stitch each button to the end of the rectangle.

11.png
12.png

Your ear guard is now ready to be used! This simple and quick project will help alleviate the pressure face mask elastics put on your ears for a more comfortable wear.

WhatsApp Image 2020-04-13 at 12.33.49 PM.jpeg

Sewing Reverse Appliqué: Free Pillow Pattern!

Maura Kang

Reverse appliqué is a beautiful way to add interest to any project such as quilts, table runners, bags or decorative pillow cases. This technique is easy to follow along with for beginners and is offers a little more texture than traditional appliqué. We’ll show you how to sew reverse appliqué, then turn it into a fun decorative pillow cover, free pattern included!

Screen Shot 2020-04-02 at 11.32.01 AM.png

Download and print the free pattern by clicking here.

Thread:
•DecoBob and DecoBob Pre-wound bobbins: https://shopwonderfil.com/product-category/decobob
• Splendor: https://shopwonderfil.com/product-category/splendor

Material:
At least two 15” x 15” complimenting fabrics, we chose cottons

Needle:
80/12 Schmetz : https://shopwonderfil.com/product/machine-needles

About the technique: In traditional applique you have a separate cut out piece of fabric and you sew it directly onto another piece. In reverse applique you actually cut out shapes out of the top layer of fabric to reveal the fabric beneath it.

Screen Shot 2020-04-02 at 12.05.39 PM.png

Cut out two pieces of fabric at the same shape and size, we did 15” X 15”. This pillow will be 14” when finished as the size we gave allows for ½” seam allowance around the pattern. Whatever fabric you pick for the bottom will peek through the top fabric - that is why we chose a patterned motif for this. For the pillow back we cut a rectangle that is 15” X 11”.

Screen Shot 2020-04-02 at 12.14.25 PM.png

Next we are going to start by grabbing our matching thread. We chose to use DecoBob since it is so lightweight and thin it makes the seams have very reduced bulk. We are also using and 80/20 needle for our machine to ensure a smooth stitch.

Screen Shot 2020-04-02 at 12.15.04 PM.png
Screen Shot 2020-04-02 at 12.21.06 PM.png

Place the two pieces of fabric right side up with the fabric you want contrasting on the bottom.  Make sure the top fabric is on top of the contrast fabric.

Screen Shot 2020-04-02 at 12.23.45 PM.png

Baste all the way around with a ¼” seam allowance just to hold the pieces together while we cut/appliqué them.

Screen Shot 2020-04-02 at 12.26.43 PM.png

Next you want to grab the pattern that is linked above. We printed this pattern onto cardstock just for a bit more stability.  We used a small knife to cut out the little diagonal windows so we can transfer it onto our fabric. Then trace through the windows you cut out onto your fabric. We used a disappearing marker.

Screen Shot 2020-04-02 at 12.27.57 PM.png
Screen Shot 2020-04-02 at 12.31.48 PM.png
Screen Shot 2020-04-02 at 12.40.58 PM.png

Once you have transferred the pattern, very carefully separate the fabric and cut away your shapes from only the top fabric. When all of the shapes are cut out, then you want to pin the top fabric to the bottom so that it will not move around. Pin around each cut out shape to prevent it from shifting. Or as an alternative option you can glue the top fabric to the bottom around the cut outs with a fabric glue.

Screen Shot 2020-04-02 at 12.42.47 PM.png
Screen Shot 2020-04-02 at 12.45.05 PM.png
Screen Shot 2020-04-02 at 12.46.08 PM.png

Then with your machine, you want to stitch around the cut out shape very close to the edge. This will secure the top to bottom layer so that we can appliqué it nicely.

Screen Shot 2020-04-02 at 12.48.04 PM.png
Screen Shot 2020-04-02 at 12.53.11 PM.png

You could choose to leave the edges raw and continue to make the rest of the pillowcase. We are going to use a decorative stitch on our machine to hide this edge, and it helps to enclose this way if your top fabric frays too. We decided to add a little pop and changed our thread to Splendor, which is a beautiful shiny rayon thread.  We kept the DecoBob in the bobbin.

Screen Shot 2020-04-02 at 1.03.46 PM.png

We recommend adding a stabilizer before finishing off the applique on the edges, as it will add a little bit more structure and strength to the area. We added tear away stabilizer to the wrong side of this piece and ironed it on.

We did a satin stitch around each edge (zig zag). Make sure that when you are sewing this, that the stitch will enclose the raw edge.

When finished the shapes should look something like this:

Screen Shot 2020-04-02 at 1.05.36 PM.png

Once you are happy with this stitching then you can tear away the excess stabilizer on the wrong side.

Screen Shot 2020-04-02 at 1.07.29 PM.png
Screen Shot 2020-04-02 at 1.07.37 PM.png

Now we are going to make the pillow back. Along one 15” edge of a back piece press a 1” hem to the wrong side of the fabric.

Screen Shot 2020-04-02 at 1.10.54 PM.png

Once you have ironed this 1” hem then fold it over again to enclose the raw edge of the fabric.

Screen Shot 2020-04-02 at 1.12.13 PM.png

Stitch along the pressed edge to create a 1” double hem. Sew close to the edge so that the hem lays flat and will not pop up. Repeat this step for the other back piece so that there is one finished hem edge on both.

Screen Shot 2020-04-02 at 1.12.59 PM.png
Screen Shot 2020-04-02 at 1.13.50 PM.png

Face the hemmed edges together and lay one back piece on top of the other. On one piece we used pins to mark 3” from the hemmed side. When placing one on top of the other it should line up with this three-inch mark- giving a 3” overlap. Then once they are placed with the 3” overlap, pin together so they stay in place.

Screen Shot 2020-04-02 at 1.18.31 PM.png
Screen Shot 2020-04-02 at 1.19.12 PM.png

Baste the raw edges where they overlap to help hold it in place. Baste at ¼” so that it will be hidden in the seam. Then place the right side of the back of the pillowcase ad the right side of the front pillowcase together.

Screen Shot 2020-04-02 at 1.30.02 PM.png
Screen Shot 2020-04-02 at 1.32.03 PM.png

Then you can pin around the outside, and stitch around the entire square. Use a ½” seam allowance.

Screen Shot 2020-04-02 at 1.33.52 PM.png

Once you have sewn the whole square then cut straight across the corners of the fabric - making sure not to catch any of your stitch. This will reduce bulk and let the corners come out crisper. Turn your pillowcase to the right side through the double hemmed opening made on the back.

Screen Shot 2020-04-02 at 1.34.20 PM.png
Screen Shot 2020-04-02 at 1.37.00 PM.png

Once pulled through then make sure the corners are poked out well. You can use your fingers, or something pointy but not too sharp such as a chopstick. Then you can lightly iron around the edges- this will make the seam lay better when the pillow form is inserted.

Screen Shot 2020-04-02 at 1.37.54 PM.png

Insert the pillow form through the back opening to finish!

Screen Shot 2020-04-02 at 1.40.21 PM.png

There are so many ways to use reverse appliqué. We hope that you enjoyed making this project! Whether you decided to make this pillow, or use the technique in another way we would love to see. Tag us on Facebook @wonderfil, Instagram @wonderfilspecialtythreads, or using the hashtag #wonderfil. Happy crafting!

DIY Face Mask By Hand With Filter Pocket & Fitted Nose Crimp

Maura Kang

WhatsApp Image 2020-04-09 at 11.48.47 AM.jpeg

Don’t have a sewing machine at home? No problem, you can still make your own face masks by sewing them by hand using our pattern that includes an optional nose crimp (for a better fit to your face) and filter pocket. The best part is, it can all be completed with items you likely have around your house already! If you’d like to check out our alternative tutorial on sewing this face mask using a sewing machine, click here.

Download the written instructions and pattern PDF here: https://bit.ly/2UTT1fN 

Materials needed:

• Top fabric in 100% cotton -
For Adult: 9” x 8” (22.9cm x 20.3cm)
For Kids: 8.5” x 8” (21.6cm x 20.3cm)
• Lining fabric in 100% cotton -
For Adult: 7” x 7.5” (17.8cm x 19cm)
For Kids: 6.5” x 7.5” (16.5cm x 19cm)
• (option 1) Elastic cord - Note that we found the round elastic more comfortable to wear over a longer period of time, but a flat elastic cord will still function if that’s what you have.
• (option 2) If you do not have any elastic cord at home, you can sew your own ties by cutting 2 of 12” x 1” strips of fabric, folding it in half twice lengthwise, and sewing down the center to secure them.
• Sewing thread - We used Designer™ 40wt polyester for the top thread as it is strong and flexible, and DecoBob™ 80wt cottonized polyester in the bobbin. Cotton sewing thread will also work just fine.
• (optional) Aluminum can or paper clip for the nose crimp

* Note that 100% cotton is recommended to sew your masks from as it offers both breathability while still doing an okay job filtering particles.

Filter:
• Cut to 6.5“ x 2.5” (16.5cm x 6.4cm). If you have access to a non-woven polypropylene fabric (used in the manufacturing of face masks), this would make the best filter to place in this pattern’s filter pocket and would be disposed of after use. However if you do not, you can use another piece of 100% cotton fabric as we did in this video. You can either dispose of it after use or wash it as described below.

Washing your face mask:
• It is recommended that your reusable face mask is washed in your home washing machine with the water settings on hot using regular washing detergent. It should then be completely dried in the dryer on high heat. Wash your face mask after each use.

WhatsApp Image 2020-04-09 at 11.48.47 AM (1).jpeg

Direction:

We’ve got two sizes for both adults and kids so you can make masks to help keep your whole family safe! Begin by cutting out your front and lining fabric pieces according to the size you need from the PDF pattern downloadable at the top. Demonstrated below is the adult size.

1.png
2.png

Press the hem up on both the main and lining pieces by ½” (1.3cm) along one of the long sides.

3.png
4.png

Then stitch across the hems on the main and lining pieces using a backstitch to secure them.

5.png

Place your lining and main fabrics right sides together, centered on the long edge opposite the hems. Pin together, then backstitch along this edge to secure them.

7.png
8.png

Flip the fabric pieces over so they are now facing the wrong sides together and press the seam so it lays flat.

9.png
10.png

If you wish you add a nose crimp for a better fit, you can cut a 4” x 0.5” (10cm x 1.3cm) strip out of an aluminum can, or use a cut piece of paper clip of pipe cleaner. Watch our video located above beginning at 1:50 to see how to safely cut open an aluminum can.

11.png

Place the nose crimp between the main and lining fabric, centered along the connecting seam. Then fold the fabric back over and pin around the strip to create a small pocket for it. You can use the placement of these pins to act as a guide for where you should backstitch around the nose crimp strip.

12.png
13.png
14.png

Once your nose crimp is secured in place, fold ½” (1.3cm) from the bottom of the main fabric and press it in place.

15.png

Flip your mask over to the right side and create 3 pleats by folding down from the top. Press the pleats into place.

16.png
17.png

Pin your pleats into place along the backside. You can now begin backstitching it all down on each end.

18.png
19.png

The bottom of your mask will have an opening for the filter to be placed!

20.png

Fold one of the ends over by ½” (1.3cm) and press. Then fold it over one more time and press it again to hide the raw edges. Pin it to hold it in place and then do the same on the other side.

21.png
22.png

Using a whip stitch, sew the inside edge to the lining to create a pocket for the elastic/strap to run through. Be careful not to sew through to the other side of the fabric.

23.png

Finally, take your elastics or sewn straps and attach a safety pin to the end to help feed it through the pockets you sewed on each end. If you used elastics, you can tie them in a knot and hide the knot inside the pocket. Sewn straps can be tied behind your head as you don the mask.

24.png

Simply place a filter in the pocket and your face mask is ready to be worn! Don’t forget to press the nose crimp around the contours of your nose for a better, tighter fit.

WhatsApp Image 2020-04-09 at 11.48.47 AM (1).jpeg

How to Darn a Sock by Hand

Maura Kang

Socks are always one of the fastest pieces of clothing to wear out, so why not try to preserve them (and its mate) instead of just tossing them away when a hole shows up? Darning is a super simple technique everyone can do, and you can use this technique for any piece of clothing, accessory, blanket, or item that has a hole in the fabric. We’ll show you two ways of darning a sock, whether you want to make it look good as new or embellish it with a statement.

Screen Shot 2020-04-07 at 11.00.09 AM.png
Screen Shot 2020-04-07 at 11.00.35 AM.png

First thing you will want to do is take a close look at the thickness of your sock. In order to mend the hole you need a thread that is a similar weight to the sock. 

For our thicker sock we are using a 3wt thread called Eleganza, which you can purchase here: https://www.suespargo.com/store.php?cat=90. We love this thread line because since it has been double gassed it results in very low lint- making it very smooth and easy to work with. It is also very strong and therefore great for mending.

3wt Eleganza

3wt Eleganza

For the thinner sock we are using the same Eleganza but in a thinner 8wt instead. You can purchase following the same link listed above.

8wt Eleganza

8wt Eleganza

We are using a darning mushroom, this will give us a nice large curved surface that makes the perfect platform to do the stitches on. We got ours from Clover, though there are many places that you can get one. As an alternative you could use anything small and curved like a snow globe, mug, jar, etc.

Screen Shot 2020-04-07 at 11.24.10 AM.png
Screen Shot 2020-04-07 at 11.24.32 AM.png

We are going to be using a needle that comes with this kit to darn our socks. There are three sizes of needle included in this- use the appropriate size based on the thread for mending the sock.

Screen Shot 2020-04-07 at 11.37.15 AM.png

You want to place your sock onto the darning tool. Make sure the right side of the sock is facing out so you can see it.

Screen Shot 2020-04-07 at 11.35.51 AM.png

You want to position so you have a nice placement of your hole over the darning tool. Then secure with the band included, or use an elastic band/hair tie.

Screen Shot 2020-04-07 at 11.36.09 AM.png

For our hole we are cutting about 20” of the Eleganza 3 wt thread. This measurement will of course differ depending on the size of your hole.

Screen Shot 2020-04-07 at 11.42.15 AM.png
Screen Shot 2020-04-07 at 11.42.52 AM.png

Thread your needle and then we are ready to start sewing! Start on the top right of your hole. Pull the thread through with a knot on the wrong side. Then pull your thread through down to the opposite side on the bottom.

Screen Shot 2020-04-07 at 11.45.26 AM.png
Screen Shot 2020-04-07 at 11.46.44 AM.png

Repeat, working from right to left. Once you have covered the hole, extend a little past into the fabric- just to secure the thread. You can remove from your needle, but leave the tail long for now as we will secure and tie it off at the end.

Screen Shot 2020-04-07 at 11.50.52 AM.png
Screen Shot 2020-04-07 at 11.53.32 AM.png

Next to make this mending stronger we are creating a weaved stitch in the opposite direction. You can use the same color of thread, but to make it look a little funkier we are doing an accenting color. Working perpendicular, with your needle weave above and below the previously created stitches. Leave a long tail where you started your stitch, and once you reach the other side take a small pick of the sock before starting the next line of the weave.

Screen Shot 2020-04-07 at 11.53.15 AM.png

When you have your stitch in the sock fabric at the end of the row, then you can continue back the way your started going under and over the opposite threads you did in the first row. Make sure you are going over and under the correct thread for your row, or else the weave pattern will not be created.

Continue until you have filled the whole area with the weave. You should have a tight and strong area now. Leave all of the thread ends long.

Screen Shot 2020-04-07 at 11.56.03 AM.png
Screen Shot 2020-04-07 at 11.58.42 AM.png

You can pull the sock off the darning tool and cut the thread tails to about 2 or 3 inches. Then pull the threads through to the wrong side of the sock using the needle.

Take the extra thread strand and stitch a few small stitches on the wrong side before tying a knot.  Repeat for all thread tails.

Screen Shot 2020-04-07 at 11.59.58 AM.png
Screen Shot 2020-04-07 at 12.00.56 PM.png

Once finished then iron the patch to smooth it out.

Now you have a super cool patch that will add a little pop of colour!

Screen Shot 2020-04-07 at 12.03.19 PM.png

If you are looking to integrate the look of your darning so it blends in with the rest of the sock, you may want to choose a smaller thread, closer to the strands in your sock, with a matching thread colour. Because the thread is taking up less space, it may take a little longer to complete your darning.  Repeat the same steps as listed above.

Screen Shot 2020-04-07 at 12.09.45 PM.png
Screen Shot 2020-04-07 at 12.20.22 PM.png
Screen Shot 2020-04-07 at 12.19.46 PM.png

We hope that this fun tutorial may have helped you salvage a few pairs of socks. If you decided to try something funkier or decided to do a subtler mend, we would love to see it. Tag us on Facebook @wonderfil, Instagram @wonderfilspecialtythreads, or using the hashtag #wonderfil. Happy crafting!

Easy DIY Face Mask With Filter Pocket & Fitted Nose Crimp

Maura Kang

To keep both you and your loved ones safe, we've created a face mask pattern and video tutorial with an optional nose crimp and filter pocket. And it can all be completed with items you probably have around the house already! Check out our easy DIY face mask tutorial from the link in our bio. Stay safe, everyone!

Download the written instructions and pattern here: https://bit.ly/2UUTIWl

Materials needed:

• 9” x 8” (22.9cm x 20.3cm) top fabric in 100% cotton
• 7” x 7.5” (17.8cm x 19cm) lining fabric in 100% cotton
• (option 1) Elastic cord - Note that we found the round elastic more comfortable to wear over a longer period of time, but a flat elastic cord will still function if that’s what you have.
• (option 2) If you do not have any elastic cord at home, you can sew your own ties by cutting 2 of 12” x 1” strips of fabric, folding it in half twice lengthwise, and sewing down the center to secure them.
• Sewing thread - We used Designer™ 40wt polyester for the top thread as it is strong and flexible, and DecoBob™ 80wt cottonized polyester in the bobbin. Cotton sewing thread will also work just fine.
• (optional) Aluminum can or paper clip for the nose crimp

* Note that 100% cotton is recommended to sew your masks from as it offers both breathability while still doing an okay job filtering particles.


Filter:

• Cut to 6.5“ x 2.5” (16.5cm x 6.4cm). If you have access to a non-woven polypropylene fabric (used in the manufacturing of face masks), this would make the best filter to place in this pattern’s filter pocket and would be disposed of after use. However if you do not, you can use another piece of 100% cotton fabric as we did in this video. You can either dispose of it after use or wash it as described below.


Washing your face mask:

• It is recommended that your reusable face mask is washed in your home washing machine with the water settings on hot using regular washing detergent. It should then be completely dried in the dryer on high heat. Wash your face mask after each use.

Direction:

Cut out the main and lining fabric as per the sizes listed. On the long side of each piece of fabric, press the hem up by ½” (or 1.3cm).

2.png

Using a ¼” (or 0.65cm) seam allowance, sew across the hems on both pieces of fabric.

3.png

The right side of your fabric will look like this:

4.png

Place the lining fabric on the top fabric right sides together with the lining piece centered in the middle of the long side and the raw edges together. Pin them in place against the raw edge.

5.png

Sew along the raw edge with a ¼” (0.65cm) seam allowance.

6.png

Flip the pieces around so they’re now facing the wrong sides together and give it a press so it lays flat.

7.png

Next we’ll be adding a nose crimp so that the face mask fits around the contours of the nose better. This will result in a snugger and more comfortable fit. We will be making our nose crimp from an aluminum can, however you can also use a piece of cut paper clip as well. If you would prefer not to include a nose crimp in your mask, you can skip this step.

8.png
9.png

To safely cut open an aluminum can, punch a hole using an exacto knife on each end of the can. Take a pair of sharp and sturdy scissors (not your fabric scissors!) and cut away the top and bottom of the can.

10.png
11.png

Cut straight up through the center to open the can up and trim away the sharp, jagged edges on each end. You’ll now have a flat piece of aluminum to cut your nose crimp from. Using an exacto knife, cut a ½” (1.3cm) strip from aluminum and trim it down to a length of 4” (10cm). Because the corners will still be sharp, we recommend buffing them out with a sheet of extra fine sandpaper so that it doesn’t tear into the fabric. A nail file will also work in a pinch.

12.png

Place the aluminum strip between the top and lining fabric, snug against the seam where they are sewn together. Keep it centered and use pins on either side and under it to hold it in place, while also giving yourself a visual on where you should sew to create a pocket around it.

13.png
14.png

Next, fold ½” (1.3cm) from the fabric on the opposite edge from the nose strip pocket and press it into place.

15.png

Flip the fabric over to the right side and fold 3 pleats all the way down the fabric. Press them into place.

16.png
17.png

Pin the pleats into place on the wrong side and sew on a ¼” (0.64cm) seam allowance from the edge of the lining fabric.

18.png
19.png

The opening at the bottom can fit a 6.5“ x 2.5” (16.5cm x 6.4cm) size filter sheet!

20.png

To create a pocket for the ear elastics (or straps if you’re sewing your own), fold the raw edges on each side over by ½” (1.3cm), then again a second time, pressing after each fold.

21.png
22.png

Sew as close as you can to the inner edge to create a hole for your elastics/straps.

23.png
24.png

Your face mask is almost complete! It will look much like this:

25.png

The last step is to put the elastic or straps through the holes. For elastics, cut two 12” (30.5cm) long lengths. If you are sewing your own straps, cut two 12” x 1” (30.5cm x 2.5cm) pieces of fabric. Fold them in half lengthwise twice and sew once down the center to secure them.

Elastics

Elastics

Fabric Straps

Fabric Straps

Using a safety pin pinned to the elastic/strap, run it through the pocket to the other side. If you are using an elastic, knot both ends and hide the knot inside the pocket. If you are using straps, they can be secured behind your head when you are ready to wear it.

28.png

To fit the mask to your face, put it on and press around the aluminum strip to mould it around the shape of your nose. Please follow the washing instructions listed at the top to ensure your reusable face mask stays sanitary!

29.png

Catnip Carrot Cat Toy

Maura Kang

1.jpg

Have a cat at home that needs some lovin'? Entertain them (and you!) with a homemade catnip-stuffed carrot toy. This simple pattern can be whipped up in under an hour but will provide several hours of fun for your fluffy feline. This simple and quick project can be done with just a few small pieces of wool or felt fabric and some basic hand stitches to make it look pretty.

Materials:

-       Download and print the free pattern here.

-       Loose catnip to stuff the toy with.

-       A sheet of orange wool or felt material, approx. 9” x 7” (we used color LN49 Kumquat from the 1/32 Merino wool size packs in Orange).

-       One or two colours of green wool or felt material, approx. 7” x 4.5” (we used colors LN14 Periodot and LN16 Pine Needle from the 1/64 Merino wool size packs in Green).

-       A top thread for sewing in the machine (we used 50wt Egyptian cotton Konfetti thread in color KT404).

-       A bobbin thread (we used 80wt DecoBob cottonized poly in color DB410).

-       #8 perle cotton embroidery thread (we used Eleganza perle cotton in colors EZ118 New Spring and EZM1060 Volcano)

(optional) A wool/acrylic thread to sew the top shut after stuffing (we used Ellana wool/acrylic in color EN49 Kumquat to pair with the orange wool precisely).

2.jpg

Begin by cutting out and tracing the free pattern (downloadable above) and cutting out your carrot pieces.

3.jpg

Use your #8 perle cotton to add some embellishments to your pieces. While you can embellish your them however you like, we used a simple chain stitch to add some accents to each wool piece.

4.jpg
5.jpg

Load your machine with a regular sewing thread in the top and bobbin. Lay your two orange carrot pieces right sides together and sew using a ¼” (quarter inch) seam allowance to sew the sides and tip together. Begin slightly below the corner on one side and end at the same place on the opposite so that you leave an opening at the top. Don’t forget to backstitch on both ends.

6.jpg

Trim and turn your piece inside out so the right sides are facing out again. Now you can stuff the pocket with catnip! Don’t overstuff the toy and ensure the top flap will lay flat so you can still sew it shut.

7.jpg

Arrange the two leaves in the top and tuck in the loose edges. Pin or clip it all together and hand sew the opening closed using the wool/acrylic thread. This thread will blend in significantly better into the wool fibres, especially if you use the Merino wool and Ellana wool/acrylic thread as they are dyed to the exact same color.

8.jpg

That’s actually all there is to it! This adorable little toy will keep your cat busy for hours. If you make it yourself, don’t forget to tag us on social media using #wonderfil to share it with us!

Chevron Embroidered: Pillbox Pincushion

WonderFil Specialty Threads

This month we want to share with you a project that would not only be fun, simple and easy to make, but also useful. For this project we decided to use the WonderFil’s Razzle and Dazzle threads.

The Razzle and Dazzle threads are perfect for hand embroidery, the silky soft 6 ply rayon thread adds a beautiful shine and sparkle to any project. Simple stitching and the usefulness of the pillbox make it the perfect project to try your hand at embroidering. This is a great project that can simply be modified and customize. Have fun with the pattern and design, these pillbox pincushions make the perfect little gift.

With a few simple seams and a little stuffing, you will be moving your pins into their new home before you know it.


Materials

  • Wonderfil Dazzle - 6180, 3130
  • Wonderfil Razzle – RZM03, RZM15
  • Wonderfil Designer -  White - DS426
  • Linen Fabric, 1/4 yd.
  • Fusible Fleece, 1/4 yd
  • Fiberfill stuffing
  • Button

Tools

  • Rotary Cutter
  • Ruler with 60 degree angle markings
  • Fabric Marking tool
  • Soft Sculpting doll needle

Basic Supplies

  • scissors
  • sewing machine
  •  pins
  •  hand sewing needle,
  • iron
  •  pressing surface


Directions

1. Fuse fleece to linen with hot iron. Cut: One - 14 ¼” x 3”, two -  4-3/4″ circles.

2. Using a ruler and the fabric marking tool draw a line along the length side panel at 1 ½”. Add the Chevron design by using 60 degree markings on the ruler. Spacing chevrons ½” apart draw a set of 2 (space them an inch apart), then add a set of 3 chevrons. Repeat pattern with 1 inch between each set.   

3. With the Razzle and Dazzle threads use a stem stitch trace along the marked chevrons in the sets of 3 alternating thread colors. Using a satin stitch sew between the sets of 2. In the same manner repeat this pattern on the remaining markings.

4. With the right sides together, sew the ends of the embroidered strip together to create the ring.

5. Fold the ring in half evenly and place pins on either side. Fold the matching pin mark ends with pins. Find the quarter marks on the circles by folding the circle in half, then proceeded to mark them in the same manner. Repeat to find the other set.

6. Match the quarter marks of the circle and the tumbler ring with right sides together. Proceed to pin it in place and machine-sew using 1/4″ seam allowance. Attach the bottom circle in the same manner, leaving 2″ opening to turn.

7. Turn the right side out. Fill the cushion with fiberfill until firm.

8. Slipstitch the opening and close using Wonderfil designer thread.

9. Position the button on the center of the circle. Sew through the center of the cushion using doll needle. Add the bottom button on opposite sides. Sew back and forth while pulling to make the buttons push into the cushion; secure.

by: Jennifer Davey from Be Still My Crafting Heart

With love and threads,

#WonderFil


Spooky Thread Palettes

Maura Kang

October 25, 2015

LOOKING FOR IDEAS ON MIXING AND MATCHING THREAD COLOURS FOR YOUR NEXT HALLOWEEN PROJECT? TAKE A GANDER AT WHAT WE'VE CHOSEN FOR THIS QUILT BY VERNA MOSQUERA.


Quilt pattern "Happy Hauntings" by Verna Mosquera.

Quilt pattern "Happy Hauntings" by Verna Mosquera.

Happy October and thanks for checking in! This week we would like to share with you this incredible quilt using the Happy Hauntings pattern by Verna Mosquera, which is an incredibly fun and modern quilt featuring an assortment of playful halloween characters. This pattern can be purchased from Verna’s website here.

We’ve created this quilt using an assortment of WonderFil threads including InvisaFil, Konfetti, and Tutti, however with our upcoming new thread line FabuLux hitting store shelves this fall, we have some new suggestions on how to pair our latest threads for the spookiest impact! Check it out below.

FabuLux: Majestic Sunrise

Our newest thread line FabuLux comes in both solid and variegated colours. Similar to our Master Quilter line, FabuLux is a 40wt 3-ply trilobal polyester with an incredible shine that helps it stand out against the fabric. Here we used a solid colour, but outlining this devilish fella in a shiny variegated thread like FabuLux will make him pop even better, as well as add more interest due to the colour-changing thread. The spool of FabuLux featured in this photo is called Majestic Sunrise and comes in warm golden yellows and the rich orange reds found in autumn.

FabuLux: Boo!

Another playful FabuLux colour that will be available soon is Boo! A halloween-esque palette showing off purple, black and orange hues that can be tied into nearly any spooky themed project.

A popular choice when you don’t want your stitching to show is the aptly named InvisaFil - a 100wt polyester thread that is perfect for adding subtle texture to your fabric. Choosing a colour that stands out against the background will allow the stitching to show a small amount of colour, while choosing one that matches the fabric makes it nearly invisible. This orange and grey is perfect to machine appliqué your pieces down. We recommend using a button hole stitch or a small zig zag.

Tutti: TU39

Tutti: TU24, Konfetti: KT601, KT402

Tutti is a 50wt 3-ply double gassed and mercerized cotton thread that we adore using in quilts. Available in 41 variegated colours, it makes a perfect accompaniment to button hole stitches that give this thread enough heft and texture to make a bold statement. Adding tones of subtle blue and green to the dominantly grey palette will help make this tombstone stand out.

Konfetti is just like our Tutti thread, but comes in 60 solid colours rather than variegated. Mixing and matching Konfetti and Tutti make a playful combination.

Spotlite: MT881 , Konfetti: KT906

Lastly, don’t be afraid to add a touch of Spotlite to your quilts. This metallic thread resists breakage and fraying unlike other metallics that are difficult to work with, and will add a lovely shine to your stitching. Here we used Konfetti to stitch these cobwebs, however trading it in for Spotlite would allow them to add a spooky shimmer to the border all around the quilt. Stay tuned as we may have a short video on using metallic threads!

Our spooky thread palette as shown: 

  • FabuLux: Majestic Sunrise, Boo!
  • Konfetti: KT906, KT601, KT402
  • Tutti: TU39, TU24
  • InvisaFil: IF122, IF711
  • Spotlite: MT881


With Love and Threads,

WonderFil