Contact Us

Use the form on the right to contact us.

You can edit the text in this area, and change where the contact form on the right submits to, by entering edit mode using the modes on the bottom right. 

2915 19 St NE
Calgary, AB, T2E 7A2

18662506101

WonderFil Specialty Thread Blog

WonderFil brings you the latest news, events, upcoming thread lines and special tips and advice. Follow WonderFil Specialty Threads on our social media: Facebook, Instagram, Twitter, Pinterest, and Youtube.

Filtering by Tag: sashiko

10 Ways to Sew with Heavy 12wt Thread

Maura Kang

Some sewers might be stumped on what to use 12wt thread for, afterall it isn’t your traditional medium sized thread. What a lot of people don’t realize is how beautiful, bold, and versatile this thicker thread can be, and what kind of effects you can create with it. We’ll also take a closer look at the different types of 12wt thread you can find and when you might want to choose one over the other.

1.png

1. Thread Painting

12wt threads are a fantastic choice for thread painting for a few reasons. Because the thread is thicker, you can actually cover more area with less thread, making it a lot more efficient to thread paint with a 12wt thread. In addition, you’ll also find that the thread sits a little higher from the fabric. This gives a bolder textural effect to your project than using a medium weight thread would.

2. Cross Stitch

These threads are thick enough for cross stitching projects, especially when you want to use a fabric or fibre with a finer weave. In this project, we used Spagetti™ and Fruitti™ 12wt cotton threads, which pull smoothly through the fabric due to their ultra low lint finish.

3. Machine Embroidery

40wt threads are the standard when it comes to machine embroidery, but you can create a new look by using 12wt thread in your embroidery machine. If you have a larger design, or a design that isn’t too intricate, a 12wt thread will show the pattern much more boldly without needing to double stitch the same lines. Your pattern will also show off better due to the thicker thread.

4. Hand Embroidery

If you love doing hand embroidery and sometimes split the strands of embroidery thread to make a finer thread, we would caution you against this. Splitting the strands of a thicker thread can weaken the thread while also giving it a lintier look. Instead of doing this, try using a 12wt thread which is comparable in size to an 8wt thread that’s been split in two. This way you won’t damage the thread, and you’ll keep your stitches looking clean and beautiful.

5. Decorative Stitching

The decorative stitches built into most sewing machines are perfect for utilizing 12wt threads for fun, stand-out stitches. They’re perfect for decorating any project, whether it’s a stocking for your family, adding a small decorative line of stitching to a piece of clothing, or embellishing any quilt or table runner. A 12wt thread will give every decorative stitch a little more emphasis than a regular medium weight thread would.

6. Needle Punch

Needle punching is a tool that can be used to create incredible textural effects, and it works best with thicker threads like 12wt. Depending on how you use the tool, you can make either dense loops or weave back and forth to fill in a space. This is a fantastic way to add a unique look to any project.

7. Big Stitch Hand Quilting

12wt is one of the best threads to use for big stitch hand quilting because the thick thread really stands out against the fabric. You’ll also find it easier to handle a 12wt thread versus a medium weight thread as it is less delicate and sits better in a wide running stitch.

8. Machine Quilting & Longarm Quilting

If you’re not afraid of bold stitches that love to show off, a 12wt thread is the perfect choice when used for quilting. 12wt is actually the thickest thread you can put through the eye of a machine needle, so you can guarantee a quilted look where the thread adds another dimension of texture and colour.

9. Red Work

Red work is a form of American embroidery that traditionally uses red thread and basic stitches to decorate household items. It can be completed with a simple backstitch following a traced pattern to create motifs that can decorate anything from dishcloths to quilts to cushion covers. A 12wt thread stands out beautifully against white fabric, making it ideal for outlining patterns.

10. Sashiko

Sashiko is a Japanese embroidery technique that uses a simple running stitch to create beautiful geometric patterns or imagery. Traditionally they use white thread on an indigo dyed fabric, but these days, you can use any colours you like. Sashiko can be done by hand using a running stitch and a long hand embroidery or sashiko needle. However, you can also purchase a sashiko machine which replicates the look of a hand stitch.

Tell us in the comments where you’ve used 12wt threads, or where you would like to try them in a project! You can find a list of stores that carry WonderFil threads on www.shopwonderfil.com/shop-local/. You can also sign up to receive weekly sewing tips, free patterns, and tutorials in our newsletter. Register by clicking here! You can unsubscribe at any time by clicking the unsubscribe button on the footer of every email you receive.

7 Ways to Use a Sashiko Machine

Maura Kang

Sashiko is a hand technique originating from Japan that uses a simple running stitch, however this machine replicates the look of a running stitch done by hand. This amazing machine can do all sorts of things with this one simple stitch, however they can be a little pricey to buy. We’ve compiled 8 techniques you can easily do yourself on the sashiko machine so you know how to use every advantage it brings.

The sashiko machine ensures stitches are uniform and consistent, making it easier and faster to accomplish your project. It only has one kind of stitch and threads differently from a regular sewing machine because it only uses the bobbin thread and no top thread.

1.png

Traditionally sashiko is done with white cotton thread on indigo dyed fabric, however you can choose any colour of thread and fabric you want. With a sashiko machine, you can even do more than just decorative stitching!

2.png

You’ll want to choose a medium weight thread as the sashiko machine will double up the stitches. So if you have too heavy a thread, you’ll end up with shredding and stitch consistency problems. I’ll be demoing with two threads. The first is a 35wt thread called Silco. This is a synthetic cotton thread that’s completely lint free. The second is Konfetti, a 50wt Egyptian cotton thread.

1. Quilting:
If you love the look of hand quilting but don’t have the time or patience to quilt an entire quilt by hand, you can do it with the sashiko machine instead. This is also a great solution for anyone with arthritis in their hands. The sashiko machine gives you the look of hand quilting, but at ten times the speed!

3.png

2. Appliqué:
You can use the sashiko machine for raw edge appliqué. This is a simple but beautiful way to appliqué your pieces down with a simple running stitch and combines the traditional look of sashiko with your appliqué project.

4.png

3. Adding trims:
The sashiko machine is perfect for quickly adding trims to clothing or home décor items, with the advantage of giving it the hand stitched look. I like to add it to sleeve cuffs, collars, bags, or pillows.

5.png

4.Couching:
It’s really easy to do couching without the need for a couching foot like a regular sewing machine requires, however it will look a little different. Place the ribbon or yarn you want to couch down horizontally across the needle and take one or two stitches, then pull it over to the other side of the needle and take another stitch or two. Continue this process to finish couching it down!

6.png
7.png

5. Braiding:
Another method of couching with the sashiko machine that creates a different look is by braiding two threads back and forth in front of the needle. Take your yarn or ribbon and place the center of it in front of the needle so you’re holding both of the ends in your fingers. Take one or two stitches to secure it, then weave both ends opposite across the front of the needle and take another one or two stitches. Continue doing this and you’ll end up with a woven couched thread.

8.jpeg

6. Fabric flower:
Using organza or another similar lightweight fabric, you can create a flower by scrunching up the fabric and stitching over it so that the edges flare up. Take a piece of fabric, about 5 inches wide and 25 inches long, depending on how large you want the flower to be. Position it along the centre of the fabric and push it up against the needle before taking a few stitches. Continue doing this while slowly turning the fabric clockwise. You’ll end up with a beautiful fabric flower that’s perfect for decorating a birthday party, or upcoming baby or wedding shower!

9.png
10.png

7. Pleats:
You can easily add a decorative pleat on a piece of clothing or home décor item using the sashiko machine. Position your fabric where you want the pleat to fall from and push the fabric up against the needle. Take a few stitches to secure it and continue to press and stitch as you sew straight down. The result is a beautiful gathered pleat.

11.png

There’s so many creative ways to use the sashiko machine, so please tell us what you’ve made in the comments below! Ready to start sewing? You can find a list of stores that carry WonderFil threads on www.shopwonderfil.com/shop-local/. You can also sign up to receive weekly sewing tips, free patterns, and tutorials in our newsletter. Register by clicking here! You can unsubscribe at any time by clicking the unsubscribe button on the footer of every email you receive.

Introducing Eleganza Perle Cotton Thread

Maura Kang

Perle cotton is one of those thread basics any hand stitcher can’t go without. So why not reach for the best? Eleganza is a gorgeous perle cotton thread that comes in an incredible 340 unique solid and variegated colours. With that kind of selection, you’ll be spoiled for choice when it comes to choosing the colours for your next project.

One of the things that make Eleganza perle cotton unique is its tight twist. This 2 ply thread resists unravelling, making it easy and efficient to sew with, without worrying about tangling or untwisting. That’s not something anyone wants to think about while they’re focused on creating something beautiful. The thread has also undergone double gassing, which is a process where 80% of the thread lint is burnt off its surface. This process is repeated a second time, making this one of the cleanest and smoothest perle cottons on the market. You’ll have no trouble stitching with this thread through all kinds of fabrics and fibres.

2.png

200 of these shades are available in 100 solid and 100 variegated colours in the WonderFil collection. These little balls come in size #8 weight thread, the most popular thread weight for any kind of hand embellishment. They also come in 140 colours in the Sue Spargo collection. Designer, author, and teacher Sue Spargo has curated her own stunning collection of Eleganza threads, available in the Original and Primitive colour collections. You’ll find the #8 weight spools of Eleganza have double the amount of thread on them as the balls in the WonderFil collection.

3.png

You’ll also find these colours available in an additional #5 and #3 thread weights. #8 is marked by green spool tops, #5 is marked by purple, and #3 by blue. This makes it easy to tell which weight you’re using at a glance. These additional thread weights make it possible to create emphasis and texture, even when doing the same embellishment stitches. It truly opens up a whole new dimension of hand embroidery.

4.png

If you’re looking for the perfect needle to match these thread weights, Sue has made it incredibly simple. Sue Spargo brand needles are coloured to match the spool tops in her collection so you’ll know right away which needles pair with the thread size.

5.png

Eleganza is the perfect choice for any hand embroidery projects, big stitch hand quilting, sashiko, visible mending, and crafts. You can even use it in the machine for bobbin work and couching, or on the loopers of a serger for a beautiful decorative edging.

6.png
7.png
8.png

Inspired to stitch with Eleganza? Shop with Sue Spargo at www.suespargo.com, or find either collection in one of your local stores at www.shopwonderfil.com. And don’t forget to share what you make with it on social media using hashtag wonderfil. We’d love to be inspired by you!

Visible Mending on Denim with a Sashiko Stitch

Maura Kang

Have your jeans sprouted a new hole? While distressed denim might be in, you can still salvage a beautiful aesthetic using visible mending. This is a gorgeous way to repair a hole in a piece of clothing and refresh your wardrobe, turning ugly holes into something beautiful and intentional.

Screen Shot 2020-04-09 at 11.15.22 AM.png

Materials:

-       A scrap piece of denim or other heavy fabric large enough to completely cover the hole you are patching, with at least 3 inches to spare on each side.
-       A thick hand embellishing thread. We will be using #8 Eleganza perle cotton thread as it stands out beautifully and is ideal for any hand embellishment.
-       A hand sewing needle that will fit your thread. We recommend using a sashiko needle as it has an eye large enough for the heavier thread, and also is much longer, making it easy to make a lot of stitches at once.  You can also use a long embroidery needle, such as a long darner, as another alternative.
-       We also recommend using a thimble while doing this technique. Because of the number of stitches we have to make it will allow you to stitch more effectively and keep your finger from bruising.
 

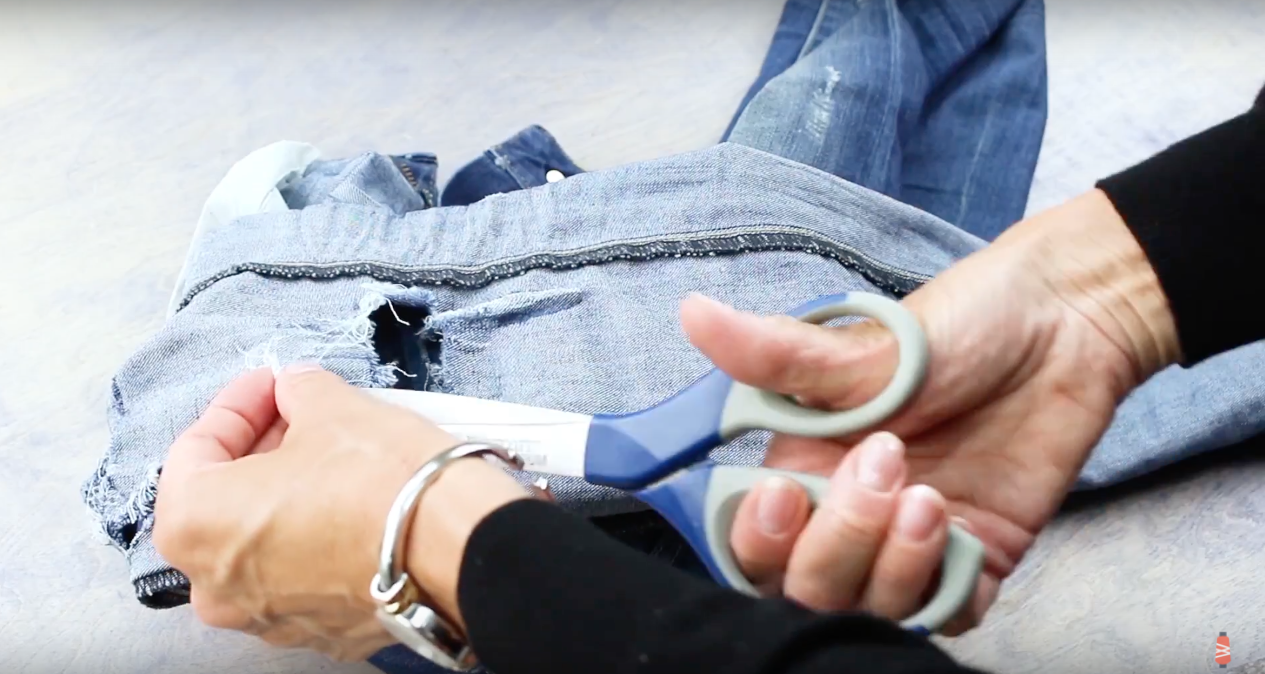
To begin, turn the jeans inside out and find the hole you want to repair. Then you’ll want to trim the excess thread around the hole to clean it up.

Screen Shot 2020-04-09 at 11.30.30 AM.png

Once the edges of the hole are trimmed and straight, place your denim scrap over the hole. Ensure that you have at least 3 inches of extra fabric around each side of the hole and pin it in place.

Screen Shot 2020-04-09 at 11.33.09 AM.png
Screen Shot 2020-04-09 at 11.33.23 AM.png

Now turn your jeans back right side out. Be careful not to get caught up on any pins. You’ll actually be able to see from the right side where you’ve placed the pins around the edge of the scrap denim, so you can use this as a guide to know where not to stitch outside of the area.

Screen Shot 2020-04-09 at 11.36.34 AM.png

Thread your needle and tie a knot at the end of your thread. You can hide your knot by starting between the two layers of fabric.

Screen Shot 2020-04-09 at 11.39.03 AM.png

Depending on what design you may want or your sewing experience, you can just do straight lines, curved, or something else funky if desired. We are going to keep it simple and just do a simple straight running stitch.

Screen Shot 2020-04-09 at 11.56.57 AM.png
Screen Shot 2020-04-09 at 12.01.30 PM.png

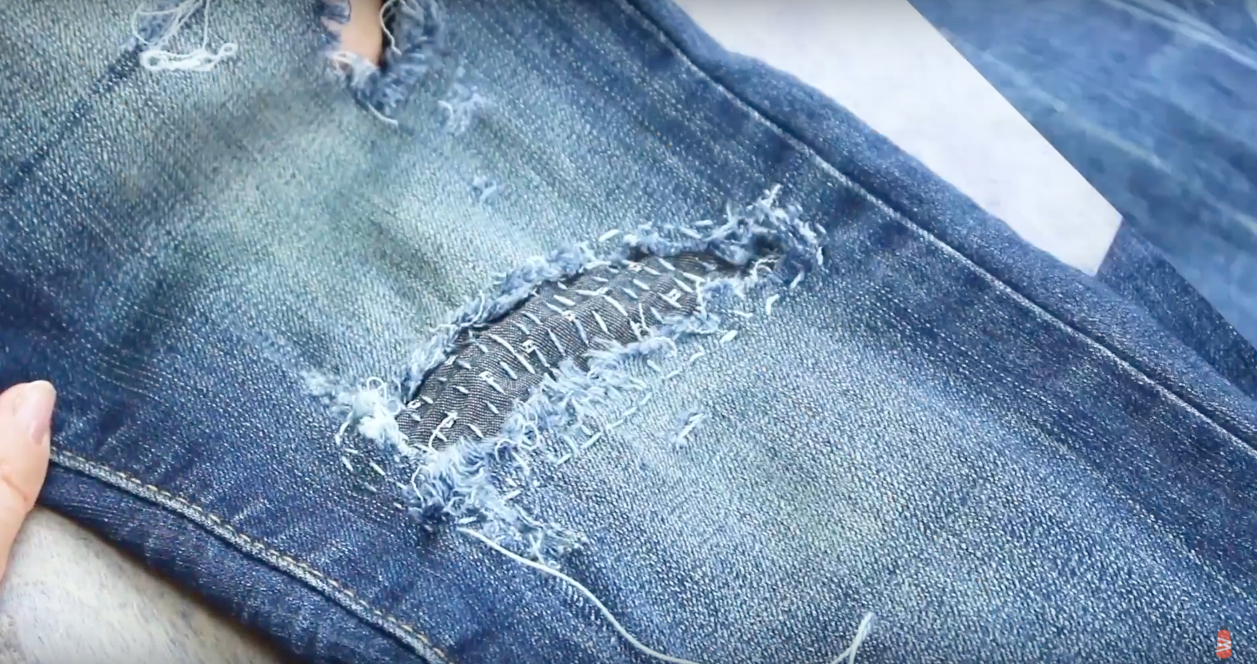
Try to keep your stitches even, but if it is not perfect that is okay because you will still achieve a hand done look. Continue doing these running stitches along the entire length of the hole, row by row. Ensure that you are stitching well past the edges of the scrap and onto the jeans themselves to ensure the scrap will be secured. When you are done it will look something like this:

Screen Shot 2020-04-09 at 12.01.06 PM.png

When you are finished do not forget to tie off the thread on the wrong side of the fabric.

Screen Shot 2020-04-09 at 12.05.03 PM.png

With this incredibly simple technique you can save your favorite pair of jeans. You can experiment with different materials and scrap fabrics for a totally unique look you can make your own!

Screen Shot 2020-04-09 at 12.06.04 PM.png

We hope that you enjoyed making this project! Everything is open to interpretation and we would love to see how yours turned out. Tag us on Facebook @wonderfil, Instagram @wonderfilspecialtythreads, or using the hashtag #wonderfil. Happy crafting!